Written by Michael Mau: Founder & CEO, Thor Computer Ltd. Cisco-certified IT engineer. 20+ years in hardware diagnostics, data centre operations, and system support. Serving London homes and businesses since 1999. Meet the Author →
Table of Contents
Table of Contents
The Windows Memory Diagnostic Tool is built directly into Windows 10 and Windows 11. Most people don’t realize it exists until their machine starts crashing. If your PC is freezing randomly, throwing blue screens, corrupting files, or simply feeling sluggish for no obvious reason, your RAM is one of the first things to test. Faulty memory causes some of the most misleading and frustrating computer problems because the symptoms are inconsistent. A crash that seems software-related is often caused by a hardware fault at the memory level.
This guide covers everything: how to run the built-in memory diagnostic tool, how to interpret the results, when to use more powerful third-party tools like MemTest86, and when to call in a professional. At Thor Computer, our Cisco-certified London engineers test RAM as part of every hardware diagnostic and this is the process we use.

1. What Is the Windows Memory Diagnostic Tool?
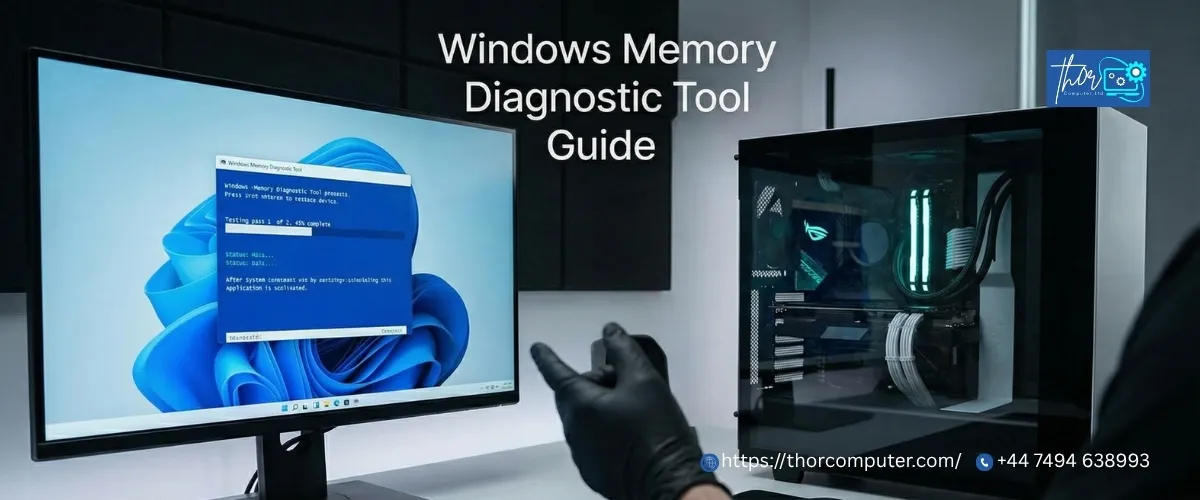
The windows memory diagnostic tool also called (mdsched.exe). It is a free, built-in RAM testing utility included in every version of Windows from Windows 7 through to Windows 11. Microsoft developed it to give users and technicians a way to test installed RAM for hardware errors without needing third-party software.
It works by doing something elegantly simple: it writes a series of test patterns into every memory location across all installed RAM sticks, then reads those patterns back. If what it reads does not match what it wrote, there is a fault in that memory location. The tool repeats this across multiple passes, with each pass using a different and increasingly demanding pattern to stress the memory cells in different ways.
What the tool does:
- Tests all installed RAM sticks for read/write errors
- Runs before Windows fully loads (ensuring nothing else interferes with the test)
- Reports results on next boot via Windows notification
- Offers three test modes: Basic, Standard (default), and Extended
What the tool does NOT do:
- It does not fix faulty RAM — there is no software repair for physical memory failure
- It does not test RAM speed or performance (only errors)
- It is not as comprehensive as dedicated tools like MemTest86
- It cannot run while Windows is live — it requires a restart
The tool is ideal for a quick first-pass check. If it finds errors, the answer is almost always RAM replacement. If it finds no errors but problems persist, stepping up to MemTest86 is the correct next move.
2. Signs Your RAM Is Failing
Before running any test, it helps to know what failing RAM actually looks like in day-to-day use. RAM problems are notorious for producing symptoms that appear to be software issues which is why they get misdiagnosed so often.
Common signs of faulty RAM:
Random Blue Screens of Death (BSODs) especially with stop codes like
MEMORY_MANAGEMENT, PAGE_FAULT_IN_NONPAGED_AREA, or IRQL_NOT_LESS_OR_EQUAL.
These codes directly reference memory addressing failures.
Application crashes with no clear trigger — a programme closes without warning, mid-task, with no error message. Different applications crash on different occasions. This randomness is the fingerprint of a memory fault.
File corruption — files that were working fine become unreadable. Documents that fail to open. Photos that display with artefacts. This happens when RAM fails to write data correctly to storage.
PC running slow for no reason — if your machine has become progressively slower and you have ruled out storage and software causes, degraded RAM can be responsible.
Failure to install programmes or Windows updates — installation processes are memory-intensive. Faulty RAM causes installations to fail partway through, often with cryptic error codes.
System freezes during heavy tasks — games, video editing, large spreadsheets, and virtual machines all demand sustained RAM throughput. Faulty sticks show their weakness under load.
Beep codes on startup — if your machine beeps in a repeating pattern when you power it on, this is the BIOS communicating a POST failure, often RAM-related.
If you are experiencing two or more of these symptoms, run a RAM memory test before spending time on software troubleshooting. It takes 15–30 minutes and either confirms or eliminates memory as the cause.
3. How to Check Your RAM Using the Windows Built-In Tool
Here is exactly how to check your RAM using the built-in Windows tool — step by step.
Step 1) Save Everything and Close All Applications
The tool requires a full restart. Save any open documents, close your browser tabs, and make sure nothing important is running. The machine will restart immediately after you confirm.
Step 2) Open the Windows Memory Diagnostic Tool
There are four ways to open it — use whichever is fastest:
Method A Search bar: Click the Start menu, type Windows Memory Diagnostic, and press Enter.
Method B Run dialog: Press Windows key + R, type mdsched.exe, and press Enter.
Method C Settings: Open Settings → type memory in the search box → select Diagnose your computer’s memory problems.
Method D Command Prompt (Admin): Type mdsched.exe and press Enter.
Step 3) Choose When to Restart
You will see two options:
- Restart now and check for problems (Recommended) — the machine restarts immediately and the test begins. Use this when you are ready to run it now.
- Check for problems the next time I start my computer — the test runs on the next reboot. Use this if you need to wrap up work first.
Step 4) Choose Your Test Mode (Optional but Important)
Once the machine restarts and the test begins, press F1 to access options before the test starts fully. You will see three test modes:
| Mode | Tests Run | Time Required | Best For |
| Basic | MATS+, INVC, SCHCKR | 5–10 minutes | Quick check, suspecting major fault |
| Standard (default) | Basic + LRAND, Stride6, CHCKR3, WMATS+, WINVC | 15–30 minutes | General use, first-pass testing |
| Extended | Standard + all advanced patterns | 1–6+ hours | Thorough testing, intermittent faults |
For most situations, Standard mode is the right choice. If Standard returns no errors but problems persist, run Extended overnight.
Use F10 to apply your settings and start the test.

5. MemTest86 The Professional RAM Test Standard
When the Windows memory diagnostic tool produces no errors, but problems continue, the next step is MemTest86. The gold standard for RAM testing is used by technicians, system builders, overlockers, and hardware engineers worldwide.
Why MemTest86 Is More Thorough
The Windows built-in tool runs after the Windows boot environment has partially loaded. MemTest86 boots entirely from a USB drive, running before any operating system is involved. This means nothing interferes with the test, no drivers, no background processes, no OS-level memory reservation. It tests the full physical address space of your installed RAM with algorithms that have been in development for over 20 years.
MemTest86 uses 13 distinct test algorithms including:
- Moving Inversions: detects address sensitivity errors
- Walking Ones/Zeros: stress tests individual bit cells
- Modulo 20: catches dynamic errors that only appear during sustained writes
- Hammer Test: tests for Row Hammer vulnerabilities in DDR4/DDR5 RAM
- Sequential Increment: detects stuck bits across all memory cells
Any one of these may catch faults that the Standard Windows test misses entirely. This is why professionals, including our engineers at Thor Computer use MemTest86 as the definitive memory test before recommending RAM replacement.
How to Use MemTest86
What you need: A USB flash drive (4GB minimum). The drive will be overwritten, so back up anything on it first.
Step 1 — Download Go to memtest86.com and download the free version (USB image). The free version covers all tests you need.
Step 2 — Create the Bootable USB Run the included imageUSB tool (Windows) or use Rufus/Balena Etcher. Select your USB drive and write the MemTest86 image to it.
Step 3 — Boot from USB Restart your PC and enter BIOS (F2, Delete, F10, or Esc depending on your manufacturer). Set the USB drive as the first boot device. Save and exit. MemTest86 will load automatically.
Step 4 — Run the Test The test starts automatically. One full pass through all 13 tests on 16GB of RAM takes approximately 4–6 hours. For reliable results, run at least two full passes ideally overnight. Any errors shown in red mean the RAM has failed.
Step 5 — Test One Stick at a Time If errors are found, shut down, remove all but one RAM stick, and retest. This identifies exactly which stick (or which motherboard slot) is faulty. Replace only what is failing.
MemTest86 Free vs. Pro
The free version is sufficient for personal and repair use. The Pro version adds automated reporting, network deployment, and additional certification features — relevant for IT departments and repair businesses testing large volumes of machines.